Свой лунапарк tftp с блэкджеком и с++17
Содержание:
Настройка и установка NFS в Ubuntu
Настраиваем, какие именно директории мы хотим открыть для совместного пользования и кому. Все это делается в файле /etc/exports:
В приведенном ниже примере я выделил директорию /data (директория с данными на сервере) в совместное пользование всем компьютерам с правами чтения и записи:
домашняя директория пользователя serhiy стала доступной в режиме только чтение для компьютера с IP 192.168.1.34. Все остальные компьютеры сети к этому разделу доступа не имеют.
ro — права только на чтение. Можно и не указывать, так как она установлена по умолчанию.
rw — дает клиентам право на запись.
no_root_squash — по умолчанию пользователь root на клиентской машине не будет иметь доступа к разделяемой директории сервера. Этой опцией мы снимаем это ограничение. В целях безопасности этого лучше не делать.
noaccess — запрещает доступ к указанной директории. Может быть полезной, если перед этим вы задали доступ всем пользователям сети к определенной директории, и теперь хотите ограничить доступ в поддиректории лишь некоторым пользователям.
Теперь нужно перезапустить nfs-kernel-server:
Если после этого вы захотите поменять что-нибудь в файле /etc/exports, то для того, чтобы изменения вступили в силу, достаточно запустить следующую команду:
Источник
How to set up a TFTP server on Fedora


Contribute at the Fedora CoreOS Test Day
TFTP, or Trivial File Transfer Protocol, allows users to transfer files between systems using the UDP protocol. By default, it uses UDP port 69. The TFTP protocol is extensively used to support remote booting of diskless devices. So, setting up a TFTP server on your own local network can be an interesting way to do Fedora installations, or other diskless operations.
TFTP can only read and write files to or from a remote system. It doesn’t have the capability to list files or make any changes on the remote server. There are also no provisions for user authentication. Because of security implications and the lack of advanced features, TFTP is generally only used on a local area network (LAN).
Install TFTP Client
At this point, the TFTP server is installed and configured.
Now, you will need to install a TFTP Client on the Client computer.
You can install the TFTP Client on the client computer by following the below steps:
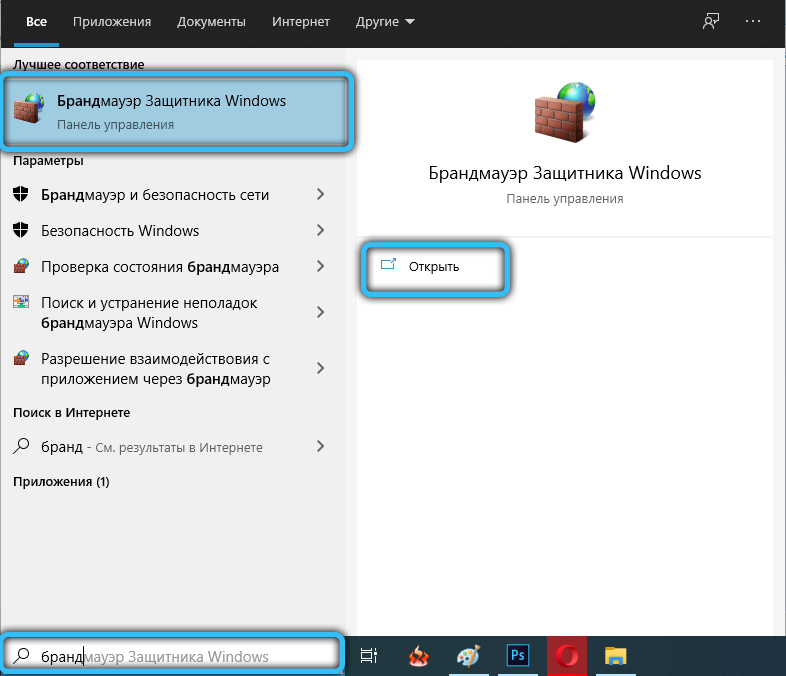
1. Click on the Start Menu and click on Control Panel.
2. Click on the Programs and Features => Turn Windows features on or off. This will open the Windows Features dialog box.
3. Scroll down until you see the TFTP Client check box and CHECK it as shown below:
4. Click on the OK button to start the installation process of the TFTP client.
This process will take some time to finish the installation. Once you are finished, you can proceed to the next step.
Как установить TFTP-сервер на Windows
Протокол Trivial FTP, как вы уже знаете, является очень простым в реализации, и если говорить о низкоуровневой передаче файлов, при условии отсутствия жёстких требований по безопасности, то он был и остаётся весьма востребованным.
Кроме загрузки ОС на рабочие станции, он широко используется для загрузки и модификации конфигураций множества встроенных устройств, являющихся частью домашних сетей и системы «Умный дом».
В частности, этот протокол нередко можно встретить на маршрутизаторах, в мобильных телефонах, в популярных медиа-стримерах. Он используется для передачи единичных файлов на относительно небольшие расстояния. А вот в глобальных сетях, том же интернете, использование TFTP недопустимо из-за низкой защищённости. Там царствует FTP, а если требуются повышенные требования к безопасности, то SFTP.
Если при помощи FTP, требующего ввода логина/пароля, можно осуществлять целый спектр операций с файлами (передача в обоих направлениях, переименование, удаление, просмотр), то в TFTP вы можете файлы только скачивать, и только по одному. Зато здесь используется стек UDP, отличающийся простотой кода, в отличие от распространённого, но достаточно сложного TCP/IP.
У протокола TFTP низкая функциональность компенсируется надёжностью, поэтому серверная часть кода протокола занимает на диске или в памяти очень мало места, что делает его идеальным кандидатом для использования во встроенных устройствах, у которых дефицит памяти – привычное явление.
Итак, если суммировать, для чего нужен клиент TFTP, то можно утверждать, что главное преимущество протокола – простота реализации его клиентской части.
ВНИМАНИЕ. Протокол не предусматривает наличие учётных записей пользователей, поэтому всегда существует риск подключения к TFTP серверу или клиенту других лиц, в том числе и со злонамеренными целями
Поэтому использовать его нужно, если сеть защищена другим способом, например, файерволом.
Хотя TFTP-сервер чаще всего можно встретить в ОС Linux, существует немало решений, предназначенных для Windows и даже для macOS (TFTPD32/64, haneWIN, WhatsUp, WinAGents и др.).
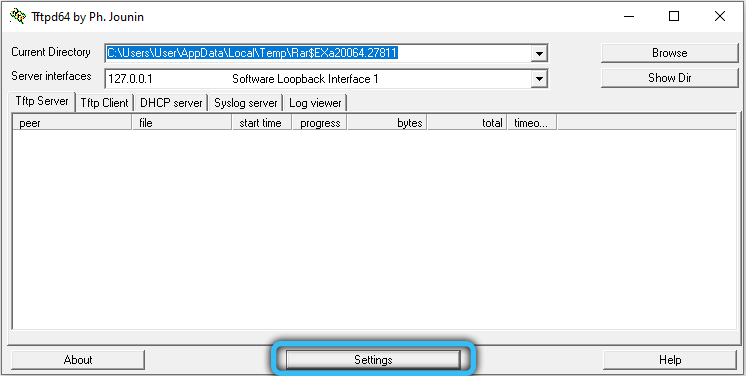
Рассмотрим процедуру установки TFTP-сервера на примере весьма популярной утилиты TFTPD32, созданной на условиях открытого исходного кода. Кроме собственно TFTP-сервера, она включает и другие серверные протоколы (DHCP, DNS, SNTP) и позволяет управлять пулом IP-адресов. Разумеется, ситуации, когда требуется наличие всех перечисленных функций, сложно придумать даже теоретически, но дополнение TFTP одной из них вполне может оказаться полезным.
При скачивании программы можно выбрать portable-версию, если не хотите возиться с инсталляцией.
При запуске утилиты нужно будет указать пару параметров:
- каталог, куда будут скачиваться файлы (дефолтный путь – место установки программы);
- IP-адрес сервера, на который нужно будет обращаться клиентам.
Для выполнения простейших операций этого будет достаточно. Но в ряде случаев потребуется дополнительная настройка программы.
Test Windows TFTP Client on Windows 10 or any Other Versions
Let’s assume that the TFTP server setup appropriately is done and files are available at the correct location. Before you download a file from the TFTP server, you must know the right file name with the extension.
In this example, I’m going to download a file called ‘tftp.zip’ from the TFTP server 192.168.1.244.
Type the below command in command prompt (you must have a working network communication with the server, the ping command is handy to confirm the connectivity)
Tftp -i GET
The below message indicates that the file transfer is successful. The file will be downloaded at the location where you are executing the command. In this case, it is C:\Users\Dinesh folder.
To upload a file using the TFTP tool, use the following command.
Tftp -i PUT
The below command shows the successful file upload to the TFTP server by Windows TFTP client. The file will be uploaded to the root of the TFTP settings on the server. We do not have any option to select the location.
As I’m using the Solarwind TFTP server in this example, the above command uploaded the file to this root location.
There you go, we learned how to install the Windows built-in TFTP client on Windows 10 and how to ensure that is working fine. We showed the simple steps to upload and download a file using the TFTP client. By the way, this method is applicable for Windows 8.1 and server versions also.
[edit] Linux
In Linux, tftp can generally be installed with whatever package manager your distribution uses.
on suse:
smart install tftp
on fedora:
yum install tftp
on ubuntu
sudo apt-get install tftp
etc.
The tftp client for Linux and OS X is very similar. When invoked, it gives the user a prompt and takes commands from the standard input.
Binary mode can be set with command-line flags — in OS X, the «-e» flag sets binary mode (among other things which are less important), and in Linux «-m binary». Binary can be set from the prompt in either (this is done below for consistency).
Typical usage looks like:
 tftp 192.168.x.x
 > binary
 > put dd-wrt.vXX_XXX.XXX
Because the transfer must be initiated in a narrow time window during the router’s bootup, tftp’s retransmit option is useful. In the following sequence of commands, tftp will retry to send the file every second for one minute. This can be issued just before the router is booted, so that it will retry to send every second while the router boots.
 tftp 192.168.x.x
 > binary
 > rexmt 1
 > timeout 60
 > put dd-wrt.vXX_XXX.XXX
If it worked, it will say something like «Sent 1769472 bytes in 9.0 seconds»
If it didn’t work, it will say «Transfer timed out.» This is often because it cannot connect to the IP address. Make sure you have manually set your computer’s IP address to one in the router’s subnet.
You can quit tftp with the ‘quit’ command or hitting ctrl+D.
Using atftp on Linux
Another way of doing this is using atftp. You can install aftp by search it in your package manager.
On Ubuntu:
sudo aptitude install atftp
On Debian (as root):
aptitude install atftp
On Fedora (as root):
yum install atftp
On Suse (as root):
smart install atftp
Then you go to the folder where you downloaded the official Linksys firmware, for instance if you downloaded it in your desktop:
cd ~Desktop
Unrar the file, for instance if the file is WRT54GL_v4.30.11_012_ETSI_EN_code.rar
unrar x WRT54GL_v4.30.11_012_ETSI_EN_code.rar
Rename the firmware to code.bin.
cp WRT54GL_v4.30.11_012_ETSI_EN_code.bin code.bin
Then you prepare this command (do not press enter yet):
atftp --option "mode octet" --option "timeout 60" --verbose --trace -p -l code.bin 192.168.1.1
Disconnect all your network cables from your router, only leaving one from the computer to the router. Then open another terminal and ping to 192.168.1.1
ping 192.168.1.1
About the atftp command: we are putting (-p) a local file (-l) called code.bin to the IP address 192.168.1.1 asking for fully information (verbose) and showing all packages (trace), also that it must be trying for one minute (timeout 60) and in octet mode. Remember, if you get «code pattern error», try with the official Linksys firmware. More information:
man atftp
atftp --help
Important: you should always try atftp with the official firmware and then flashing to DD-WRT with the HTTP webpage on Administration, «Upgrade Firmware»; specially if you get «code pattern error».
Note: if you use Gnome or KDE you can get problems while trying to put your static IP address. Most of the times, applications like NetworkManager (aka nm-applet) or knetworkmanager will try to get a dynamic IP address, so you should first kill them. For example:
sudo killall NetworkManager
or
sudo killall nm-applet
TFTP Download/Upload File
I created the following text file in “/srv/tftp”:

Linux-based network monitoring for your network.
Try it Now
netbeez.net$ cat hello_server.txt
Hello world from TFTP server!
|
1 2 |
netbeez.net$cat hello_server.txt Hello world from TFTP server! |
On the client side I start a tftp interactive session and I download it as follows:
netbeez.net$ tftp
tftp> connect 172.31.0.154
tftp> get hello_server.txt
Received 31 bytes in 0.0 seconds
tftp> quit
netbeez.net$ cat hello_server.txt
Hello world from TFTP server!
|
1 2 3 4 5 6 7 |
netbeez.net$tftp tftp>connect172.31.0.154 tftp>get hello_server.txt Received31bytes in0.0seconds tftp>quit netbeez.net$cat hello_server.txt Hello world from TFTP server! |
On the client side, I can upload a file with the following commands:
netbeez.net$ tftp
tftp> connect 172.31.0.154
tftp> put hello_client.txt
Sent 31 bytes in 0.0 seconds
tftp> quit
|
1 2 3 4 5 |
netbeez.net$tftp tftp>connect172.31.0.154 tftp>put hello_client.txt Sent31bytes in0.0seconds tftp>quit |
If you get the following error when uploading:
tftp> put hello_client.txt
Error code 1: File not found
|
1 2 |
tftp>put hello_client.txt Error code1File notfound |
It can mean one of the following:
- The file “hello_client.txt” doesn’t exist on the servers “/srv/tftp” directory
- The “- -create” option is not enabled on the server (see above)
- The file “hello_client.txt” exists on the server but it’s not publicly writable
TFTP is a handy and lightweight server which is useful to upload and download files, but it comes with some important limitations that you have to keep in mind. You may have used TFTP if you’ve ever remotely booted a machine with PXE or BOOTP.
shamil / tftp_fedora.md
TFTP server on Fedora
Here are some quick notes on setting up a TFTP server on Fedora 23. This is used, for example, to send Linux kernel images and other binaries to a bootloader on an embedded system.
First, install the packages:
The tftp itself will allow you to test your configuration by attempting a file transfer. The default directory for TFTP transfers is /var/lib/tftpboot .
The TFTP server works through xinetd so you will need to add a rule that says in.tftpd: ALL to /etc/hosts.allow :
Enable and start the TFTP server:
Tell the firewall to allow TFTP traffic:
You should now be able to transfer files via TFTP.
berndbausch commented Jun 20, 2018 •
Very useful, but doesn’t work anymore in this way on Fedora 28. It seems to me that firewall-cmd isn’t aware of a change in Netfilter policies since one of the more recent kernel revisions.
firewall-cmd —add-service tftp results in this kernel message:
nf_conntrack: default automatic helper assignment has been turned off for security reasons and CT-based firewall rule not found. Use the iptables CT target to attach helpers instead.
When trying to connect, the tftp client then gets an ICMP message «port unreachable».
I also tried firewall-cmd —set-automatic-helpers=yes with little change (the ICMP message becomes «admin prohibited»).
I guess for now I have to use ipfilter to tweak the rules.
zetaomegagon commented Nov 29, 2018
firewall-cmd —add-service tftp —permanent is incorrect syntax. It should be firewall-cmd —add-service=tftp —permanent . They missed the = sign.
This has been the syntax since at least F24 (when I started using Fedora).
You can’t perform that action at this time.
You signed in with another tab or window. Reload to refresh your session. You signed out in another tab or window. Reload to refresh your session.
Источник
Первичная настройка
После того как инсталляционный процесс завершен, вам предстоит выполнить некоторые первичные настройки для корректной работы утилиты. Здесь следует учитывать следующие наиболее важные моменты:
первым делом указывается порт и адрес для подключения;
впоследствии следует установить пароль администратора;
крайне важно сменить настройки соединения, чтобы не происходило постоянное включение одного и того же хоста в автоматическом порядке;
далее вы выставляете порты, по которым будут подключаться посетители ресурса, а также те лица, кто будет иметь доступ к редактору;
в самом конце следует изменить количество подключений со стандартного значения 0 на любое иное, чтобы при работе не перезагружать сеть.
Выполнить все эти возможности вы сможете сразу после запуска приложения на своем приспособлении, перейдя в раздел «Файл», и выбрав такую отдельную вкладку, как «Setting».
Настройка TFTP сервера
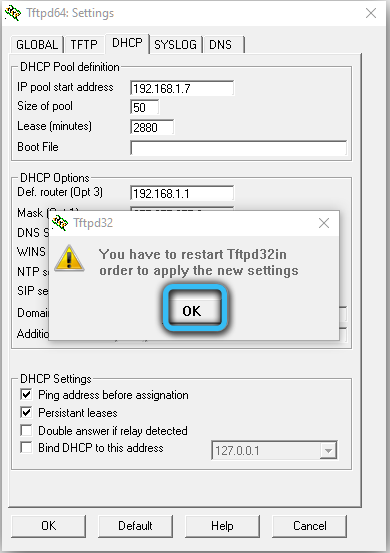
Если требуется использование DHCP сервера, например, для выдачи динамических айпишников в пределах малой сети, необходимо зайти в раздел Setting и выбрать вкладку DHCP.
Здесь нам нужно указать:
- исходный IP адрес (получаемый на маршрутизаторе);
- диапазон выдаваемых клиентам адресов;
- указание шлюза сети не является обязательным;
- четвёртый параметр – маска подсети.
Подтверждаем внесение изменений нажатием ОК.

Поскольку в основе TFTP лежит использование транспортного протокола нижнего уровня UDP, в котором установление соединения не предусмотрено, задача эмуляции соединения становится прерогативой внешнего протокола, в нашем случае – TFTP. Проблема в том, что межсетевые экраны в большинстве случаев не умеют идентифицировать соединения, инициированные протоколом TFTP, так что этот тип трафика он пропускать не в состоянии.
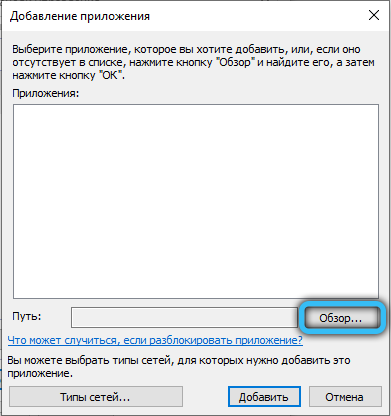
Но если TFTP-сервер располагается в пределах защищённой сети, а клиентские устройства – перед файерволом, то проблем быть не должно, но потребуется внесение изменений в настройки файервола:
- нужно добавить правило транспортировки пакетов данных из внешнего айпишника на адрес сервера TFTP, указанный в конфигурации программы (через порт 69 TFTP сервера);
- разрешить перенаправление трафика из внутренней сети на внешний IP-адрес.

В большинстве маршрутизаторов при передаче данных с более защищённой сети в менее защищённую проблем не возникает, но, когда требуется выполнить противоположную задачу, как раз и потребуется выполнение перечисленных выше действий.


Проблема в том, что не все сетевые роутеры/маршрутизаторы позволяют выполнить такие настройки. Но многие из них оснащены функцией просмотра трафика, направляемого с использованием протокола TFTP, при этом они в состоянии динамически изменять таблицу трансляции, позволяя пропускать пакеты извне, идущие в локальную сеть. Так, чтобы настроить файервол маршрутизатора Cisco PIX, необходимо выполнить команду fixup protocol tftp.

Существует альтернативный способ решения проблемы: можно обязать сервер TFTP задействовать порт 69 в двух направлениях, не только для приема запросов, идущих от клиентов, но и для пересылки им ответов. Тогда файервол сможет корректно обрабатывать оба типа запросов, руководствуясь записями, имеющимися в таблице трансляций.
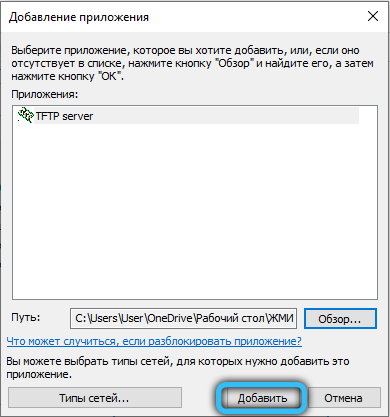

Так, чтобы настроить WinAGents TFTP Server подобным образом, необходимо в настройках программы установить галочку напротив опции Enable firewall support.

How to Check a TFTP Server from Windows 10 Client
Let’s assume that the TFTP server setup is done correctly and the network security firewall is accepting incoming and outgoing TFTP traffic in the server.
Once we installed the client on Windows 10 PC, we need to allow TFTP traffic in the Windows firewall or your third-party firewall/anti-virus solution.
- You can altogether disable the Windows firewall to test it.
- Allow the TFTP program or port number in the firewall.
How to Completely switch off the Windows Defender Firewall to allow TFTP
5) Go to the control panel, enable the ‘Large Icons’ view. This will show the all Control panel icon.
6) Click on ‘Windows Defender Firewall’ and open ‘Turn Windows Defender Firewall on or off.’
7) Depending on the connectivity type, you can turn off the Windows firewall. If you are not sure, turn off both (Private and Public network settings). This will entirely off the network protection. It is highly recommended to put back the settings once the TFTP test completed. Or else, follow the next step to enable only TFTP traffic.
❓ What is TFTP Server?
Trivial File Transfer Protocol (TFTP) is used for small file transfers and does not require any authentication. TFTP is helps you to transfer files, backup network, and boot PCs without a disk. It uses UDP, which does not have error checking as TCP does. TFTP servers are mostly used in devices like mobile phones and routers.
Moreover, the implementation of the TFTP protocol is applied when there is no security and authentication needed. So, TFTP is hardly exercised in a computer network, as it lacks security, which makes it vulnerable.
You are likely to encounter TFTP servers on Linux, but sometimes you will find it on Windows and Mac as well. One major drawback of TFTP is that it does not have any access privileges in place.
Therefore, you access a TFTP server only if you are not using an external firewall or another third-party device which makes it less secure than other protocols like FTP and SCP.
Client Configuration
Install the TFTP client:
Run the tftp command to connect to the TFTP server. Here is an example that enables the verbose option:
Remember, TFTP does not have the ability to list file names. So you’ll need to know the file name before running the get command to download any files.
13 Comments
Edgar Hoch
What crazy description for tftp configuration do you release into the world? Why should anyone be allowed to upload any files to the server without any restrictions? What application is there that requires this and you can’t use a more secure method (with authentication and authorization)?
You don’t need this to boot devices over the network. The only thing you need to do, apart from installing the packages, is to enable the socket with “systemctl enable -now tftpd.socket” and place the files needed for booting over the network in /var/lib/tftpboot/ or a subdirectory in it, preferably as owner and group root and only writeable for root and readable for all.
You should NOT make /var/lib/tftpboot/ writeable for all. You should NOT use the -c option. You don’t need to make a copy of tftpd.server and tftpd.socket in /etc/systemd/system/; if you want to make local changes, create a directory /etc/systemd/system/tftpd.server.d/ and create a file in it with the extension “.conf”, where you just enter the change – see “man systemd.unit”. This could be used, for example, to make changes to the options when calling the service:
ExecStart=/usr/sbin/in.tftpd -s /var/lib/tftpboot
Do NOT enter “WantedBy=multi-user.target”! You also don’t activate the tftpd.service, but tftpd.socket (see above). This has the advantage that the service only runs and occupies resources when it is needed (and after some time of inactivity (default 15 minutes) it stops itself).
Why should someone use the tftp client to download a file like server.logs (as in your example)? Somebody has to put the file there first.
TFTP is only needed for booting devices over the network, usually with PXE – to load a boot kernel, grub, or similar. Everything else the device should do via other services.
People should only use the tftp client to test the connection. Upload or download files to a server should only be done via secure services, e.g. ssh / scp / sftp / rsync via ssh or via network file systems.
Thank-you for taking the time to bring up some valid concerns.
The intent of the article was not meant to try to ask anyone to embrace tftp or to even suggest it should be anyone’s first choice. I would not expect any enterprise environments to ever use this in production.
This article was written as more of a way to just show how to configure a legacy application such as this.
It was even noted in the article that it is not a secure method of uploading files:
“There are also no provisions for user authentication. Because of security implications and the lack of advanced features, TFTP is generally only used on a local area network (LAN). ”
“Note TFTP is an inherently insecure protocol, so this may not be advised on a network you share with other people.”
But I have come across occasions where I’ve been asked how to set this up even with my recommendation to use a more secure method.
Источник
Best TFTP server
| Name | IPv4/IPv6 | File Size Limit | Link |
|---|---|---|---|
| SolarWinds Free TFTP server | IPv4 | 4 GB | Learn More |
| IPv4 | 33 MB | ||
| IPv4 | 4 GB |
1) SolarWinds Free TFTP server
SolarWinds provides a free TFTP server for Windows that offers basic functionalities like IP-range lockdown, etc. It can transfer files up to 4GB in size. This server management service is easier to manage with native Windows tools.
Key Features:
- Suitable for transferring device configuration images
- Communicates with several devices simultaneously
- It offers concurrent transfers from multiple devices and runs as a Windows service.
- Let’s you authorize a specific IP address or a range of IPs altogether.
- Easy to use TFTP software with backup network devices and configurations.
- Offers highly scalable multi-user administration and advanced device config backup.
- Free TFTP server which runs on Windows easily
2) Spiceworks TFTP server
Spiceworks is a complete IT management tool that provides its users with free TFTP servers to make their work easy.
This TFTP software is one of the best TFTP servers developed for IT professionals to track their network device config. It also enables you to backup and view all your config in one place.
Features
- Allows you to compare current network configration with backups.
- These TFTP servers can be used for configuration image transfers
- Helps you to push out firmware updates in the background.
- Free and in-built features of Spiceworks.
3) Progress WhatsUp TFTP Server
WhatsUp Gold is one of the best TFTP servers, which helps save you time while doing networking. This service-based tool allows you to securely transfer files across the network.
Features:
- It offers a simple transfer of system configuration.
- Sturdy, clean, and attractive GUI based interface.
- It helps you to save time and effort when uploading and downloading the file.
- Compatible with the older versions of Windows such as XP, Vista, and others.
4) TFTP Desktop Server
TFTP desktop server is the best solution for updating routers, OS, image transfer, and remote booting. It also allows you to configure multiple devices in a single network.
Features:
- Real-time TFTP graph transfer helps you to work across the network.
- Unlimited file sizes: no 16/32MB file size limitation
- Graphs TFTP transfers in real-time
- Directory and IP address-based security
- Secured and locked TFTP root folder
- It offers security based on the directory as well as the IP address.
- Extremely fast file transfers
5) WinAGents
WinAgents provides a fully recognized TFTP server. It is a specially built tool to work consistently in the background. It helps you to create stock copies of different data like flash images, config files, and device settings in case of an emergency.
Features:
- Offers virtual TFTP folders, servers, and graphic utilities for status control.
- Offers highly scalable server architecture that has a built-in cache system and remote server administration.
- It helps you to set different access rights for various folders.
- It provides an option for setting the highest precedence for the server process
- Provide IP based access control
- File transmission using firewalls, and high precedence for a server process.
6) atftpd
ATFTPD is a Windows TFTF server that is widely used in various types of networks. It offers multithreaded and multicast architecture.
Features:
- Full TFTP options support with high compatibility options.
- It also supports PXE or MTFTP specifications.
- Provides fast servers to make your packages search as fast as possible.
- It helps you to replace the requested filename with the new one.
- Allows users to restrict accessing the untrusted hosts.
- Free TFTP Server for Linux.
7) haneWIN TFTP server
haneWIN TFTP is a multithreaded server-based and fully realizable TFTP server for all versions of Windows. This TFTP server for Windows helps you to achieve maximum reliability and high performance while transferring the data.
Features:
- Implemented as a Windows service and also supports all types of Windows versions.
- This TFTP server for Windows includes an intuitive control panel for accessing all services.
- Offers multithreaded architecture for high performance, security, and reliability as well.
- It helps you to receive data directly into another application using a pipe option.
Setting up the TFTP Client
The TFTP Client depends on the successful installation and configuration of the TFTP server. The client is probably the one that you will be using the most.
The only task you might need to do with the server is to update the shared files and input/remove some IPs.
When using the TFTP server, don’t forget about the following settings (already mentioned).
- The TFTP server service has to be up and the application is running.
- Configure the right TFTP folder.
- Make sure no Firewall and Antivirus is blocking the application and connection.
- If you are file sharing to a remote location, don’t forget about port forwarding.
- Make sure all your TFTP clients can reach your TFTP server.
From the TFTP client
Most networking devices already have TFTP enabled. For example, to transfer a Cisco Switch image from the server to the device, you would have to specify the IP address of the TFTP server on the client (Cisco Switch).
As you can see from the screenshot below, this switch does not have any configuration or image filename.
It does have a default address and a TFTP address. So to receive these missing files, you can use the IOS command “copy tftp startup-config ”.
Another example, from a Huawei Switch (screenshot below).
The first line (TFTP get) downloads the files from the TFTP Server (192.168.0.2) to the switch.
The second line (TFTP put) uploads the files from the switch device to the TFTP server.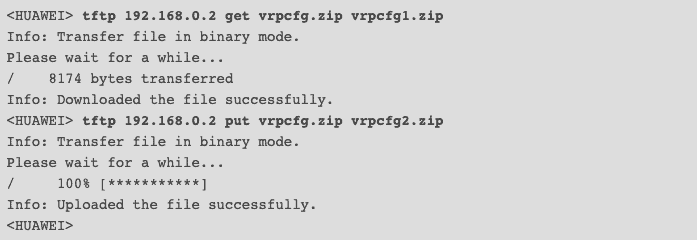
But networking devices are not the only ones that can run TFTP clients. You can also run the client on a Windows system.
Transfer File with TFTP Client
You are now ready to transfer file using the TFTP client.
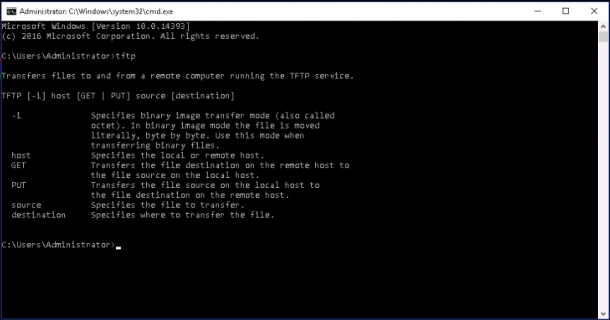
Go to the TFTP client computer, open the command line interface and run the following command:
You should see all the options available with tftp command in the following page:
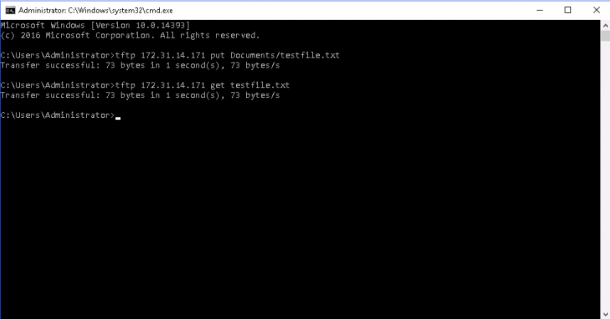
If you want to send a file to the TFTP server, use the following syntax:
For example, to send the file named testfile.txt located in Documents directory to the TFTP server run the following command:
Once the file transfers successfully, you should see the following output:
If you want to transfer file from the TFTP server to your local computer, use the following syntax:
For example, transfer the file named testfile.txt from the TFTP server to your local computer run the following command:
Once the file transfers successfully, you should see the following output:
Example Screen:
You can also transfer the files over the internet using the Public IP address of the TFTP server – Please remember, there is not encryption or any security when sending over the Internet!
Соображения безопасности
TFTP не включает механизмов входа в систему или контроля доступа
Необходимо соблюдать осторожность при использовании TFTP для передачи файлов, когда требуются аутентификация, контроль доступа, конфиденциальность или проверка целостности
Обратите внимание, что эти службы безопасности могут быть предоставлены выше или ниже уровня, на котором работает TFTP
Также необходимо проявлять осторожность в правах, предоставляемых процессу сервера TFTP, чтобы не нарушать безопасность файловой системы сервера. TFTP часто устанавливается с такими элементами управления, что только файлы с общедоступным доступом для чтения доступны через TFTP
Также обычно запрещены перечисление, удаление, переименование и запись файлов через TFTP. Передача файлов по TFTP не рекомендуется, если присущие протоколу ограничения могут вызвать непреодолимую ответственность.
TFTP часто устанавливается с такими элементами управления, что только файлы с общедоступным доступом для чтения доступны через TFTP. Также обычно запрещены перечисление, удаление, переименование и запись файлов через TFTP. Передача файлов по TFTP не рекомендуется, если присущие протоколу ограничения могут вызвать непреодолимую ответственность.
Установка atftp в Linux
Попытка установить сервер atftpd из репозиториев приведет к установке еще одного сервера — одного из супер-серверов inet — демона, запускающего программы по событию, в данном случае по факту появления на 69 порту UDP запросов на подключение. Вы скажите: «А что же тут плохого?». Вообщем-то ничего, но если вы используете Debian версии 8 и выше или Ubuntu версии 15.04 и выше, то вы наверняка слышали о SystemD. SystemD — новый менеджер инициализации, пришедший на смену init. На конец 2015 года поддержка SystemD не реализована для серверов TFTP — мы сделаем это вручную. Поэтому, лучше устанавливать TFTP сервер из исходных текстов и сразу перейти в соответствующий раздел нашей статьи, но если вы всё же решили поизвести установку atftpd из репозиторией комадой
apt-get install atftpd
незабудьте остановить подтянувшийся inet и, собственно, сам atftpd
systemctl stop atftpd inetd
А также выключить их
systemctl disable atftpd inetd
Для избежания недоразумений также рекоменду удалить скрипт запуска atftpd из /etc/init.d/
rm /etc/init.d/atftpd
И стереть его упоминание из конфигурационного файла inet с помощью, например редактора nano:
nano /etc/inetd.conf #удалите строчку, начинающуюся с tftp
Избежать всего этого поможет сборка TFTP сервера из исходных текстов. Для этого нужно скачать архив с исходниками например c сайта sourceforge с помощью wget
wget http://downloads.sourceforge.net/project/atftp/atftp-0.7.1.tar.gz #версия может отличаться
Распаковать архив:
tar -xzvf atftp-0.7.1.tar.gz #версия может отличаться
Перейти в каталог с распакованным содержимым
cd atftp-0.7.1 #версия может отличаться
Выполнить конфигурационный скрипт, указав в качестве папки назначения /opt/atftp (вы, конечно, можете выбрать любую другую папку)
./configure —prefix=/opt/atftp
Создать эту папку
mkdir /opt/atftp
Собрать atftp
make
И, наконец, собранные файлы, закинуть в папку назначения
make install
На последок почистим за собой
cd ..
rm -R atftp-0.7.1
и создадим символические ссылки на исполняемые файлы
ln -svi /opt/atftp/sbin/atftpd /sbin/
ln -svi /opt/atftp/bin/atftp /usr/bin/