Программа inkscape
Содержание:
Заливки и обводки
Доступ ко многим функциям inkscape реализован через диалоговые окна. Наверное самым простым способ покрасить объект в разные цвета будет открыть активировать его и выбрать цвет на палитре цветов.
Но более мощный инструмент управления цветами объекта находится в диалоге заливки и обводки. Этот диалог доступен в верхнем пункте главного меню «Объект» или по комбинации клавиш Shift+Ctrl+F. Выберите какой-нибудь объект, например, эллипс, как на рисунке ниже, и откройте диалоговое окно заливки и обводки.
Вы увидите, что диалоговое окно имеет три вкладки: «заливка», «обводка» и «стиль обводки». Закладка «Заливка» позволяет редактировать заливку выбранных объектов. С помощью кнопок сразу под названием закладки, можно выбрать типы заливки, включая и первый пункт «нет заливки» (кнопка с крестиком), сплошной цвет заливки, а также линейные и радиальные градиенты. Для рисунка выше была активирована вторая кнопка сплошной заливки.
Ниже кнопок с видами заливки на закладке «Заливка» вы увидите варианты выбора цвета. Для каждого способа выбора цвета есть своя собственная вкладка: RGB, CMYK, HSL и «Круг». Довольно удобно выбирать цвет на закладке «Круг», где вы можете повернуть треугольник внутри круга, чтобы выбрать цвет на цветовом круге, а затем выберите оттенок этого цвета в треугольнике. Для всех цветов изменять прозрачность можно с помощью ползунка «Альфа-канала» (прозрачность). Прозрачность измеряется в % непрозрачности, т.е. 100% абсолютно непрозрачный цвет и, наоборот, 0% абсолютно прозрачный.
Всякий раз, когда вы выбираете объект, цвет в описанном выше диалоговом окне обновляется, показывая цвет текущей заливки и обводки. Если выбрано несколько объектов, диалоговое окно показывает их средний цвет. Поэкспериментируйте с этим диалоговым окном. Теперь вы можете создавать разноцветные фигуры и даже полупрозрачные.
На закладке «Обводка», можно сделать обводку объекта без заливки или сделать заливку сплошного цвета и настроить ее прозрачность:
Последняя закладка в этом диалоговом окне «стиль обводки», позволяет задать ширину, тип линии обводки и другие параметры обводки объекта:
Ну, и, наконец, вместо того, чтобы заливать фигуры сплошным цветом, можно использовать градиенты для заливки или обводки:
При переходе от сплошной заливки цветом к градиенту создается настройка градиента, для идентификации которой программа присваивает настройке номер.
Только что созданная настройка градиента использует предыдущий цвет сплошной заливки фигуры, который переходит из непрозрачного цвета в прозрачный. Для управлении градиентом заливки фигуры активируйте инструмент градиент в боковом окне инструментов или нажмите Ctrl+F1. Появятся две направляющие градиента в заливке фигуры. Перемещаете направляющие (ручки) градиента и вы увидите как он изменяется. Направляющие градиента в зависимости от их длины изменяют насыщенность и форму градиента. Так изменяя длину ручек (направляющих) градиента можно из кругового градиента сделать овальный и т.д. Цвет градиента можно менять в палитре цветов inkscape или в диалоговом окне по кнопке «изменить». У градиента есть два цвета, цвет ручки и цвет центрального маркера. Если нажать на центральный маркер, то в диалоговом окне отобразится его цвет и прозрачность и их можно поменять и то же самое можно сделать для цвета ручки. Для этого надо активировать маркер любой из двух ручек градиента.
Еще один достаточно удобный способ изменить цвет объекта — это воспользоваться инструментом «Пипетка» в боковом окне инструментов или F7. Просто щелкните в то место рисунка, где уже есть нужный вам цвет и этот цвет будет присвоено заливке выбранного объекта. Щелчок пипеткой с нажатой клавишей Shift назначит выбранный цвет цвету обводки.
Other User Interface
General
- Canvas background color can be set without exporting it (background transparency is only used for export but not the canvas).
- Panning the canvas with the Space bar is now always turned on and doesn’t require an additional mouse button press to grab the canvas: just press the Space bar and move the mouse pointer to pan the canvas.
Guides
- Guides visibility can be toggled by clicking the ruler
-
Guides can now have labels, and the colour of individual guides can also be set by the user. To label or colour a guide, double click on the guideline to bring up the guide properties dialog.
Menu/Access
- The interface elements are accessible through the keyboard with ALT+key in many more dialogs
- “Text and Font”, “Fill and Stroke”, and “Check Spelling” dialogs are added to the text object context menu (right click)
- Menu items renamed:
- Edit -> Preferences
- Edit -> Input Devices
- File -> Cleanup Document
- Checkboxes to indicated status of View -> Grid/Guides/Snap/Color Management
- Group/Ungroup from the context menu
Preferences
- New keyboard shortcut editor
- Prefs -> Interface — New option for dockbar and switcher style (icons, text, icons & text) (bug #1098416)
- Prefs -> Interface -> Windows — optionally don’t save & restore documents viewport (bug #928205)
- Prefs -> Behavior -> Steps — unit selector for steps (move, scale, inset/outset) (bug #170293)
- Prefs -> Behavior -> Steps — option for relative snapping of guideline angles (rev 10307)
- Prefs -> Behavior -> Clones — optionally relink linked offsets on duplication (bug #686193)
- Prefs -> Input/Output -> SVG output — NEW: optionally enforce relative or absolute coordinates (bug #1002230)
Dialogs
- Dialog status and position is remembered between sessions
- Most dialogs now dockable (including “Object properties”, “Object attributes”, “Text and Font”, “Check spelling”, “Export PNG image”, “XML editor”, “Find/Replace”, and “Tiled clones”)
- New preference to allow Windows users to choose between native and Gtk Open/Save dialog
- Preferences dialog cleanup
- Document Metadata dialog merged into Document Properties
Simple calculations in spinboxes
In most spinboxes (a spinbox is an entry field with up and down “spinbuttons” next to it) you can now write simple calculations. Some examples:
- 2 * 3
- 50 + 100 , or
- ((12 + 34) * (5 + 5) — 2) / 2
Moreover, you can use units in entering values, like 2 + 2 cm . The result will be converted to the selected unit for the particular entry.
Configurable Control Handles
New preferences have been added to allow for the size of the on-canvas controls to be increased or decreased. The “Input Devices” section has been updated to control this.
Regression fixes
- Potentially missing command line output in Inkscape 0.92.2 on Windows 7. (Bug # 1714278 )
- Extensions in the ‘Raster’ submenu relying on ImageMagick were broken and caused crashes in Inkscape 0.92.2 on Windows. (Bug # 1720330 )
- gcodetools were creating wrong orientation points since the dpi change had been made for Inkscape 0.92 (Bug # 1680760 )
- The ‘Clone original’ path effect that was partially broken in Inkscape 0.92.2 works again to fill a path with a PowerStroke applied to it (useful for drawing cartoons) (Bug # 1715433 )
- The preferences dialog was tiny by default (Bug # 1360213 )
- Node handles no longer get too large when selected, and they also revert back to standard size when deselected (Bug # 1568644 )
- Export to .odg (Open Document Drawing) works again on Windows (Bug # 1654034 )
- Inkscape no longer freezes when trying to import clipart from OpenClipart when the openclipart.org server takes too long to respond to requests (Bug # 1745521 )
- Texts that are written in vertical direction now have their marks (e.g. accents) on the correct side again ( gitlab commit )
Работа с документами
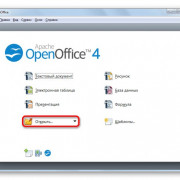
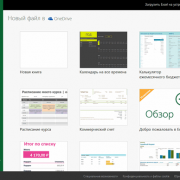
Для создания нового пустого документа используйте Файл⇒Создать либо Ctrl+N. Для создания нового документа из шаблонов Inkscape используйтеФайл⇒Создать по шаблону… или Ctrl+Alt+N.
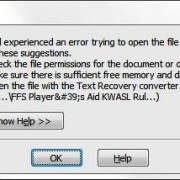
Чтобы открыть документ SVG, используйте Файл⇒Открыть (Ctrl+O). Чтобы сохранитьФайл⇒Сохранить (Ctrl+S),или Файл⇒Сохранить как… (Shift+Ctrl+S) чтобы сохранить под новым именем. (Хотя в Inkscape есть функция автосохранения, всё же стоит сохранять документ как можно чаще.)
Inkscape использует формат SVG (Scalable Vector Graphics — Масштабируемая векторная графика) для своих файлов. SVG является открытым стандартом и широко используется в графических пакетах. Формат SVG использует язык разметки XML, поэтому файлы в этом формате могут редактироваться любым текстовым или XML-редактором (отдельно от Inkscape). Помимо SVG, в Inkscape можно работать и с другими форматами. Перечень поддерживаемых форматов файлов можно найти в диалоговых окнах Сохранить и Импортировать.
Для каждого документа Inkscape открывает новое окно. Вы можете переключаться между ними с помощю менеджера окон (например, Alt+Tab), либо с помощью сочетания клавиш Inkscape — Ctrl+Tab циклически переключая документы. Для практики попробуйте создать несколько новых документов и переключайтесь между ними. Примечание: Inkscape относится к этим окнам как к вкладкам в браузере, это значит, что Ctrl+Tab работает только для документов, запущенных в одном процессе. Если вы откроете несколько документов через файловый менеджер или запустите несколько копий Inkscape, то переключение работать не будет.
Creating text
Inkscape is capable of creating long and complex texts. However, it’s also pretty convenient for creating small
text objects such as heading, banners, logos, diagram labels and captions, etc. This section is a very basic
introduction into Inkscape’s text capabilities.
Creating a text object is as simple as switching to the Text tool (F8), clicking somewhere in
the document, and typing your text. To change font family, style, size, and alignment, open the Text and Font
dialog
(Shift+Ctrl+T).
That dialog also has a text entry tab where you can edit the selected text object — in some situations, it may
be more convenient than editing it right on the canvas (in particular, that tab supports as-you-type spell
checking).
Like other tools, Text tool can select objects of its own type — text objects -so you can click to select and
position the cursor in any existing text object (such as this paragraph).
One of the most common operations in text design is adjusting spacing between letters and lines. As always,
Inkscape provides keyboard shortcuts for this. When you are editing text, the
Alt+< and
Alt+> keys change the letter
spacing in the current line of a text object, so that the total length of the line changes by 1
pixel at the current zoom (compare to Selector tool where the same keys do pixel-sized object scaling). As a
rule, if the font size in a text object is larger than the default, it will likely benefit from squeezing
letters a bit tighter than the default. Here’s an example:
The tightened variant looks a bit better as a heading, but it’s still not perfect: the distances between letters
are not uniform, for example the “a” and “t” are too far apart while “t” and “i” are too close.
The amount of such bad kerns (especially visible in large font sizes) is greater in low quality fonts than in
high quality ones; however, in any text string and in any font you will probably find pairs of letters that will
benefit from kerning adjustments.
Inkscape makes these adjustments really easy. Just move your text editing cursor between the offending
characters and use Alt+arrows to move the
letters right of the cursor. Here is the same heading again, this time with manual adjustments for visually
uniform letter positioning:
In addition to shifting letters horizontally by
Alt+Left or
Alt+Right, you can also move them
vertically by using Alt+Up or
Alt+Down:
Of course you could just convert your text to path
(Shift+Ctrl+C)
and move the letters as regular path objects. However, it is much more convenient to keep text as text — it
remains editable, you can try different fonts without removing the kerns and spacing, and it takes much less
space in the saved file. The only disadvantage to the “text as text” approach is that you need to have the
original font installed on any system where you want to open that SVG document.
Similar to letter spacing, you can also adjust line spacing in multi-line text objects.
Try the
Ctrl+Alt+<
and
Ctrl+Alt+>
keys on any paragraph in this tutorial to space it in or out so that the overall height of the text object
changes by 1 pixel at the current zoom. As in Selector, pressing Shift with
any spacing or kerning shortcut produces 10 times greater effect than without Shift.
Tools
Node tool
The tool control bar for the Node Tool features a new dropdown to insert new nodes on the selected segments extreme values. For example, (as demonstrated in the image below) it is possible to add a new node at the highest point in a curve using Insert Node at Max Y
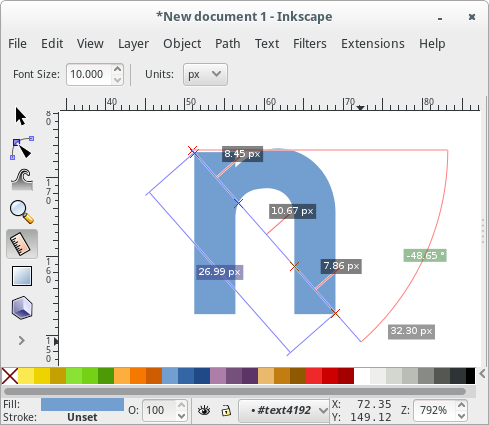
Measurement tool
The Measurement tool is a new feature for the artist to measure the elements in their drawing. To use the measurement tool, simply choose the tool, click anywhere on the drawing and drag the ruler out. The measurement tool will live-update with measurements of length and angles as you pass over objects in your drawing.
Text tool
- Text size default unit is now points ( ) and is customizable ( , , , , , , )
- Text toolbar shows full list of font style variants for that font
- Files with text in units read correctly
- Font substitution warning dialog
Gradients
- Gradient toolbar enhanced to select and modify gradient stops, invert, repeat, and link gradients
- On-canvas gradient editing fixes: double clicking to create stops, correct focus on select
- Gradients sortable by color, name and usage in Fill/Stroke
- Gradients can be renamed in Fill/Stroke
Zooming in or out
The easiest way to zoom is by pressing - and + (or =) keys.
You can also use Ctrl+middle
click or
Ctrl+right
click to zoom in,
Shift+middle
click or
Shift+right
click to zoom out, or rotate the mouse
wheel with Ctrl. Or, you can
click in the zoom entry field (in the bottom right region of the document window, labelled “Z”), type a
precise zoom value in %, and press Enter. We also have the Zoom tool (in the toolbar on left)
which lets you to zoom into an area by dragging around it.
Inkscape also keeps a history of the zoom levels you’ve used in this work session. Press the `
key to go back to the previous zoom, or
Shift+` to go forward.
Эллипсы
Инструмент для редактирования эллипсов («Рисовать круги, эллипсы и дуги» F5) может создавать эллипсы и круги, которые вы можете превращать в сегменты или дуги. Горячие клавиши такие же, как и у инструмента редактирования прямоугольников:
-
With Ctrl, draw a circle or an integer-ratio (2:1, 3:1, etc.) ellipse.
-
With Shift, draw around the starting point as center.
Давайте исследуем ручки эллипса. Выберите красный эллипс:
Once again, you see three handles initially, but in fact they are four. The rightmost handle is two overlapping
handles that let you “open” the ellipse. Drag that rightmost
handle, then drag the other handle which becomes visible under it, to get a variety of pie-chart segments or
arcs:
Чтобы получить сегмент, потяните ручку вне эллипса, а для получения дуги — внутри его. На верхнем примере 4 сегмента слева и 3 дуги справа. Дуги — это незакрытые фигуры, т.е. обводка идёт вдоль эллипса, но не соединена в концах дуги. Вы можете сделать это более наглядным, убрав заливку и оставив только обводку:
Note the fan-like group of narrow segments on the left. It was easy to create using angle
snapping of the handle with Ctrl. Here are the arc/segment
handle shortcuts:
-
With Ctrl, snap the handle every 15 degrees when dragging.
-
Shift+click to
make the ellipse whole (not arc or segment).
The snap angle can be changed in Inkscape Preferences (in
Behavior⇒Steps).
Другие две ручки в эллипсе используются для изменения размера вокруг центра. Их горячие клавиши схожи с клавишами ручек, закругляющих прямоугольник:
-
Drag with Ctrl to make a
circle (make the other radius the same). -
Ctrl+click
to make a circle without dragging.
Как и у прямоугольника, ручки управления, меняющие размер, регулируют ширину и высоту в собственных координатах эллипса. Это значит, что сплюснутый или повёрнутый эллипс может быть вытянут или сжат по линии собственных осей, оставаясь сплюснутым или повёрнутым. Попробуйте изменить размер этих эллипсов при помощи ручек, меняющих размер:
Экспонента
Параметр экcпонента контролирует расстояние между шагами интерполяции. Экспонента 0 делает расстояние между копиями объектов равным.
Здесь приведён результат другого простого примера с экспонентой 0.
The same example with an exponent of 1:
with an exponent of 2:
and with an exponent of -1:
Когда имеешь дело с экспонентой в расширении Интерполяция, очень важен порядок выбора объектов. В приведённых выше примерах, звезда слева была выбрана первой, а шестиугольник справа был выбран вторым.
View the result when the path on the right was selected first. The exponent in this example was set to 1:
Группировка
Несколько объектов могут быть объединены в группу. При перемещении и трансформации группа ведёт себя также как и обычный объект. Как следует из иллюстрации ниже, три объекта слева независимы, в то время как правые объекты сгруппированы. Попробуйте перетащить сгруппированные объекты.
Для создания группы нужно выбрать один или более объектов и нажать Ctrl+G. Для разгруппировки нужно нажать Ctrl+U предварительно выбрав группу. Эти действия также доступны с помощью правого кликаи меню Объектв панели меню. Сами по себе группы могут быть сгруппированы как одиночные объекты. Подобная поэтапная группировка может быть сколько угодно сложной. При этом следует помнить, что Ctrl+U разгруппирует только последнюю группировку. Нужно нажать Ctrl+U несколько раз, если хотите полностью разгруппировать сложносгруппированные группы (либо использовать Расширения⇒Расстановка⇒Разгруппировать до конца (Deep Ungroup)).
Очень удобно то, что не нужно разбивать группу для редактирования отдельных объектов. Выполнив Ctrl+клик по объекту, Вы его выберете и сможете редактировать. Таким же образом работает комбинация Shift+Ctrl+click, позволяющая редактировать несколько объектов независимо от группы.
Для входа в группу, нужно навести курсор на неё и нажать двойной клик, при этом можно редактировать каждый объект в группе без разгруппировки. Для выхода из группы нажмите двойной клик на пустой области холста.
Попробуйте трансформировать или переместить отдельные объекты из предыдущего примера (правая верхняя картинка) без разгруппировки, затем выберите всю группу обычным образом и убедитесь, что объекты остались сгруппированными.
Редактирование контуров
В отличие от фигур, созданных инструментами фигур, перо и карандаш создают так называемые контуры. Контур — это последовательность отрезков прямых линий и/или кривых Безье, которая как и любой другой объект в Inkscape может иметь собственные параметры заливки и обводки. В отличие от фигур контур может свободно редактироваться смещением любого из его узлов (а не только предустановленных рычагов) или перетаскиванием его сегмента. Выберите этот контур и включите инструмент редактирования узлов (F2):
You will see a number of gray square nodes on the path. These nodes can be
selected by click,
Shift+click, or by
dragging a rubberband — exactly like objects are selected by the
Selector tool. You can also click a path segment to automatically select the adjacent nodes. Selected nodes
become highlighted and show their node handles — one or two small circles connected to
each selected node by straight lines. The ! key inverts node selection in the current
subpath(s) (i.e. subpaths with at least one selected node);
Alt+! inverts in the entire path.
Paths are edited by dragging their nodes, node handles, or directly
dragging a path segment. (Try to drag some nodes, handles, and path segments of the above path.)
Ctrl works as usual to restrict movement and rotation. The
arrow keys, Tab, , ,
<, > keys with their modifiers all work just as they do in selector, but
apply to nodes instead of objects. You can add nodes anywhere on a path by either double clicking or by
Ctrl+Alt+click
at the desired location.
You can delete nodes with Del or
Ctrl+Alt+click.
When deleting nodes it will try to retain the shape of the path, if you desire for the handles of the adjacent
nodes to be retracted (not retaining the shape) you can delete with
Ctrl+Del. Additionally, you can
duplicate (Shift+D) selected nodes. The
path can be broken (Shift+B) at the
selected nodes, or if you select two endnodes on one path, you can join them
(Shift+J).
A node can be made cusp
(Shift+C), which means its two handles
can move independently at any angle to each other; smooth
(Shift+S), which means its handles are
always on the same straight line (collinear); symmetric
(Shift+Y), which is the same as smooth,
but the handles also have the same length; and auto-smooth
(Shift+A), a special node that
automatically adjusts the handles of the node and surrounding auto-smooth nodes to maintain a smooth curve. When
you switch the type of node, you can preserve the position of one of the two handles by hovering your
mouse over it, so that only the other handle is rotated/scaled to match.
Also, you can retract a node’s handle altogether by
Ctrl+clicking on
it. If two adjacent nodes have their handles retracted, the path segment between them is a straight line. To
pull out the retracted node,
Shift+drag
away from the node.
Заливка и обводка
Вероятно, самый простой способ раскрасить объект в какой-либо цвет — это выбрать объект и щелкнуть образец (цветное поле) на палитре под холстом, чтобы раскрасить его (изменить цвет заливки).
Кроме того, вы можете открыть диалоговое окно Swatches из
Viewменю (или нажать ), выбрать палитру, которую вы хотите использовать, щелкнув маленький треугольник в ее верхнем правом углу, выбрать объект и щелкнуть любой образец, чтобы заполнить объект (изменить цвет заливки).Shift+Ctrl+W
Более мощным является диалоговое окно «Заливка и обводка» из
Objectменю (или нажмите ). Выберите фигуру ниже и откройте диалоговое окно «Заливка и обводка».Shift+Ctrl+F
Вы увидите, что в диалоговом окне есть три вкладки: «Заливка», «Обводка» и «Стиль обводки». Вкладка «Заливка» позволяет редактировать заливку (внутреннюю часть) выбранного объекта (ов). Используя кнопки чуть ниже вкладки, вы можете выбрать типы заливки, включая отсутствие заливки (кнопка с X), плоскую заливку цвета, а также линейные или радиальные градиенты. Для формы выше будет активирована кнопка плоской заливки.
Ниже вы видите коллекцию палитр цветов , каждая на своей вкладке: RGB, CMYK, HSL и Wheel. Возможно, наиболее удобным является средство выбора колеса, где вы можете вращать треугольник, чтобы выбрать оттенок на колесе, а затем выбрать оттенок этого оттенка внутри треугольника. Все палитры цветов содержат ползунок с надписью «A» для установки
альфа (непрозрачности) выбранного цвета.
Каждый раз, когда вы выбираете объект, палитра цветов обновляется для отображения его текущей заливки и обводки (для нескольких выбранных объектов в диалоговом окне отображается их
средний цвет). Поиграйте с этими образцами или создайте свои собственные:
Используя вкладку Stroke paint, вы можете удалить
обводку (контур) объекта или назначить ему любой цвет или прозрачность:
Последняя вкладка, Stroke style, позволяет вам установить ширину и другие параметры обводки:
Наконец, вместо однотонного цвета вы можете использовать
градиенты для заливки и / или обводки:
Когда вы переключаетесь с одного цвета на градиент, вновь созданный градиент использует предыдущий плоский цвет, переходя от непрозрачного к прозрачному. Переключитесь на инструмент «Градиент» ( или просто
), чтобы перетащить маркеры градиента — элементы управления, соединенные линиями, определяющими направление и длину градиента. Когда любой из маркеров градиента выбран (выделен синим), в диалоговом окне «Заливка и обводка» устанавливается (и отображается) цвет этого маркера вместо цвета всего выбранного объекта.Ctrl+F1G
Еще один удобный способ изменить цвет объекта — использовать инструмент «Пипетка» ( F7или D). С clickпомощью этого инструмента в любом месте чертежа, и цвет, по которому вы щелкнули, будет назначен заливке выбранного объекта ( назначит цвет обводки).Shift+click
Moving, scaling, rotating
The most frequently used Inkscape tool is the Selector. Click the topmost button (with
the arrow) on the toolbar, or press s, F1 or toggle the tool using
Space. Now you can select any object on the canvas. Click on the rectangle below.
You will see eight arrow-shaped handles appear around the object. Now you can:
-
Move the object by dragging it. (Press Ctrl to
restrict movement to horizontal and vertical.) -
Scale the object by dragging any handle. (Press
Ctrl to preserve the original height/width ratio.)
Now click the rectangle again. The handles change. Now you can:
-
Rotate the object by dragging the corner handles. (Press
Ctrl to restrict rotation to 15 degree steps. Drag the cross mark to
position the center of rotation.) -
Skew (shear) the object by dragging non-corner handles. (Press
Ctrl to restrict skewing to 15 degree steps.)
While using the Selector, you can also use the numeric entry fields in the Tool Controls bar (above the canvas)
to set exact values for coordinates (X and Y) and size (W and H) of the selection.
Graphical Editor / User Interface
Programs which provide a graphical user interface include Inkscape extensions, which either come with Inkscape, or , as well as external or standalone programs.
Inkscape Extensions
JessyInk is an Inkscape extension, which as of version 0.91, comes installed with Inkscape. It creates a slideshow type of animation for presentations, to be viewed in web browsers, by means of embedding JavaScript in the SVG file. Their wiki contains tutorials and other documentation, and there is some info in the Inkscape manual, as well.
Sozi is a presentation application which produces translations, zooms and rotations to be viewed in web browsers, by means of embedding JavaScript in the SVG file. It’s editor started its life as an Inkscape extension (which has to be installed). However, to allow for a more flexible and user-friendly interface, Sozi developers have decided to make it a standalone program. At some point in the near future, the Sozi extension will no longer work with Inkscape, and users will need to install the standalone version. (The Sozi extension does still work in Inkscape version 0.91, but that may be the last version of Inkscape which supports Sozi as an extension.) There is a series of tutorials about the use of the extension on their website. As the standalone version is a lot more intuitive to use, the not-yet-written documentation shouldn’t be an obstacle to using it.
XIA can be installed either as an extension or a standalone program. It creates HTML5 interactive images, which consist of interactive webpages (such as for presentations), that can even contain simple games. Interactivity includes mouse click, hover, and drag and drop. On their website can be found documentation in the form of a PDF file, an instructional video, and several example files, showing each use case which XIA can create.
Websites and Web Services
AniGen is a browser-based, Free and Open Source SVG animation editor. Development is focused on Chrome, but it should work ok in Firefox, too. User interface is a bit hard to use at first, but decent results can be achieved with an Inkscape source SVG opened directly for editing.
Standalone Programs
Xia and Sozi
Both programs (see above) are also available as standalone versions. For Sozi, this is intended as a replacement for the extension, which is no longer being developed.
GIMP is a free/open source, 2D graphics editor, which can create, import and export, both raster and vector images. (It’s primarily for raster graphics, but has some minimal vector features.) It has a relatively simple and easy to use GIF animation feature, with at least 3 tutorials on their website. You can find them by looking through their Documentation page. Basically, images drawn with Inkscape need to be exported to PNG, before they are imported into GIMP (hint: in GIMP, use Import as Layers). Note that there are MANY other programs which can create GIF animations — just search!
Tupi is a free/open source program which can animate both raster and vector images. Their Documentation page provides links to their manual, tutorials, examples, faq, and more.
Synfig Studio is a free/open source 2D animation program, which can import and utilize SVG images. Starting with version 0.91, Inkscape can even export the native Synfig format, SIF. There are both a manual and tutorials in their wiki.
enve is a relatively young free/libre 2D animation software with support for both importing SVG files and creating animated SVG documents.
Blender is a free/open source 3D animation suite, which can import SVG images. There are both manual and tutorials on their Support page.