Introduction
Содержание:
- Important globals
- Доступные команды Grunt
- Контекстные классы
- Важные глобальные переменные
- Заводские Android браузеры
- Responsive breakpoints
- Модули, navbars, и виртуальные клавиатуры
- Создание первой веб-страницы с помощью Bootstrap
- Sass
- Create First Web Page With Bootstrap
- Quick start
- Community
- Quick start
- Community
- What is Bootstrap?
- Адаптивные классы
- Community
- Что такое Bootstrap?
- Quick start
- Important globals
- Alignment
- Internet Explorer 8 и Respond.js
- Reordering
- Responsive classes
Important globals
Bootstrap employs a handful of important global styles and settings that you’ll need to be aware of when using it, all of which are almost exclusively geared towards the normalization of cross browser styles. Let’s dive in.
HTML5 doctype
Bootstrap requires the use of the HTML5 doctype. Without it, you’ll see some funky incomplete styling, but including it shouldn’t cause any considerable hiccups.
Responsive meta tag
Bootstrap is developed mobile first, a strategy in which we optimize code for mobile devices first and then scale up components as necessary using CSS media queries. To ensure proper rendering and touch zooming for all devices, add the responsive viewport meta tag to your .
You can see an example of this in action in the .
Box-sizing
For more straightforward sizing in CSS, we switch the global value from to . This ensures does not affect the final computed width of an element, but it can cause problems with some third party software like Google Maps and Google Custom Search Engine.
On the rare occasion you need to override it, use something like the following:
With the above snippet, nested elements—including generated content via and —will all inherit the specified for that .
Learn more about box model and sizing at CSS Tricks.
Reboot
For improved cross-browser rendering, we use Reboot to correct inconsistencies across browsers and devices while providing slightly more opinionated resets to common HTML elements.
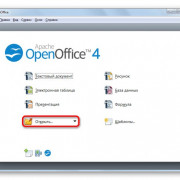
Доступные команды Grunt
(Просто собрать CSS и JavaScript)
Регенерирует каталог с скомпилированными и уменьшенными CSS и файлами JavaScript. Обычно для пользователя Bootstrap , это команда необходима.
(сборка и проверка документов активов)
Сборка и тестирование CSS, JavaScript, и прочих активов, которые используются при локальном использовании документации через .
(Построить абсолютно все и запустить тесты)
Компиляции and минифайлы CSS and JavaScript, строит сайт документаций, запускает HTML5 валидатор против документов, восстанавливает активы настройщика, и многое другое. Требует Jekyll. Обычно это необходимо, только если вы взломали сам загрузчик Bootstrap.
Контекстные классы
Использовать контекстные классы для стиля строк таблицы или отдельных ячеек.
| Класс | Описание |
|---|---|
| Применяет цвет при наведении на конкретную строку или ячейку | |
| Указывает на успешное или позитивное действие | |
| Указывает на нейтральные информативные изменения или действия | |
| Указывает на предупреждения, которые могут потребовать внимания | |
| Указывает на опасное или потенциально негативное действие |
| # | Заголовок столбца | Заголовок столбца | Заголовок столбца |
|---|---|---|---|
| 1 | Column content | Column content | Column content |
| 2 | Column content | Column content | Column content |
| 3 | Column content | Column content | Column content |
| 4 | Column content | Column content | Column content |
| 5 | Column content | Column content | Column content |
| 6 | Column content | Column content | Column content |
| 7 | Column content | Column content | Column content |
| 8 | Column content | Column content | Column content |
| 9 | Column content | Column content | Column content |
Регулярное таблица вариантов предпосылки не доступно с обратным таблица, однако, вы можете использовать для достижения подобных стилей.
| # | Заголовок столбца | Заголовок столбца | Заголовок столбца |
|---|---|---|---|
| 1 | Column content | Column content | Column content |
| 2 | Column content | Column content | Column content |
| 3 | Column content | Column content | Column content |
| 4 | Column content | Column content | Column content |
| 5 | Column content | Column content | Column content |
| 6 | Column content | Column content | Column content |
| 7 | Column content | Column content | Column content |
| 8 | Column content | Column content | Column content |
| 9 | Column content | Column content | Column content |
Передать смысл для ассистивных технологий
Используя цвет, чтобы добавить смысл только обеспечивает визуальную индикацию, которая не будет доведена до пользователей ассистивных технологий, таких как экранные дикторы. Убедитесь, что информация обозначается цвет либо очевидно из самого содержимого (например, текст), или включен с помощью альтернативных средств, таких как дополнительный текст, скрытый с класс.
Важные глобальные переменные
Bootstrap использует несколько важных глобальных стилей и настроек, которые вы должны знать при его использовании, все они являются почти исключительно ориентированы на нормализацию кросс стилей браузера. Давайте начнем.
В HTML5 Тип документа
Bootstrap требует использования HTML5 doctype. Без него вы увидите местами неполные стили, но в том числе он не должен вызывать каких-либо значительных сбоев.
Адаптивный Мета-тег
Bootstrap в первую очередь разработан для мобильных устройств, стратегия, в которой мы сначала оптимизируем код для мобильных устройств, а затем масштабируем компоненты по мере необходимости с помощью запросов на основе CSS. Чтобы обеспечить правильную визуализацию и масштабирование касания для всех устройств, добавьте адаптивный мета тег viewport в свой .
Вы можете увидеть пример этого в действии в .
Размерность блоков
Для более простой калибровки в CSS, то переключатель глобальный значение для . Это гарантирует , не влияет на конечный вычисляется Ширина элемента, но это может вызвать проблемы с некоторыми программами сторонних разработчиков, таких как карты Google и Google пользовательского поиска.
В тех редких случаях, вы должны переопределить его, использовать что-то вроде следующего:
Приведенные выше фрагменты, вложенные элементы, в том числе контент, созданный с помощью и —Все наследуют указанную для .
Узнать больше о модель и размер в CSS трюки.
Normalize.css
Для улучшения кросс-браузер рендеринга, мы используем чтобы устранить небольшие расхождения в разных браузерах и на разных устройствах. Мы и в дальнейшем построить на этом с нашей, чуть более самоуверенные типы с Reboot.
Заводские Android браузеры
Из коробки, Android 4.1 (и даже некоторые новые версии) ставят приложение Браузера в качестве веб-браузера по умолчанию(в отличие от Chrome). К сожалению, стандартные браузеры имеют множество ошибок и несоответствий с CSS в целом.
Меню выбора
На элементе, в Android браузере не будет отображаться элементы управления если есть и/или . (Смотри этот вопросы на StackOverflow более детально.) Используйте фрагмент кода ниже, чтобы удалить этот CSS и сделать элемент без стиля на Android браузере. Избегать недовольство юзера помогает использование браузеров: Chrome, Safari и Mozilla.
Хотите увидеть пример? Проверьте это JS Bin demo.
Responsive breakpoints
Since Bootstrap is developed to be mobile first, we use a handful of media queries to create sensible breakpoints for our layouts and interfaces. These breakpoints are mostly based on minimum viewport widths and allow us to scale up elements as the viewport changes.
Bootstrap primarily uses the following media query ranges—or breakpoints—in our source Sass files for our layout, grid system, and components.
Since we write our source CSS in Sass, all our media queries are available via Sass mixins:
We occasionally use media queries that go in the other direction (the given screen size or smaller):
Note that since browsers do not currently support , we work around the limitations of and viewports with fractional widths (which can occur under certain conditions on high-dpi devices, for instance) by using values with higher precision for these comparisons.
Once again, these media queries are also available via Sass mixins:
There are also media queries and mixins for targeting a single segment of screen sizes using the minimum and maximum breakpoint widths.
These media queries are also available via Sass mixins:
Similarly, media queries may span multiple breakpoint widths:
The Sass mixin for targeting the same screen size range would be:
Переполнение и прокрутка
Поддержка на элемент весьма ограничен в iOS и Android. С этой целью, когда вы прокрутите мимо верхней или нижней части модального в любом из браузеров этих устройств, в контент начнет прокручиваться. Смотрите Хром ошибка № 175502 (исправлено в Chrome и V40) и В WebKit ошибка #153852.
текстовых полей iOS и прокрутки
Начиная с iOS 9.3, в то время как модальные открыт, если начальное касание прокрутки жест в пределах границы текста или В содержание под модальным будет прокручиваться вместо модальных себя. Смотрите В WebKit ошибка № 153856.
Виртуальная клавиатура
Обратите внимание — если вы используете форму ввода в модальном окне или навигации, iOS имеет ошибку отображения, через которую не обновляется позиция фиксированных элементов при вызова виртуальной клавиатуры. Существуют некоторые обходные пути для этого, в том числе — трансформирующие элементы , или при выявлении фокуса на элементе вызывают таймер и пробуют исправить это вручную
Bootstrap не обрабатывает такие ошибки, так что вам нужно самим это решить.
Меню Навигации
Элемент не используется на iOS в навигации из-за сложности с z-index. Таким образом, чтобы закрыть выпадающие меню, необходимо просто нажать элемент выпадающего (или ).
Создание первой веб-страницы с помощью Bootstrap
1. Добавление документа HTML5
Bootstrap использует HTML-элементы и свойства CSS, для которых требуется документ HTML5.
Всегда включайте в начало страницы тег документа HTML5 вместе с атрибутом lang и правильным набором символов:
<!DOCTYPE html><html lang=»en»> <head> <meta charset=»utf-8″> </head></html>
2. Bootstrap 3-первый мобильный
Bootstrap 3 предназначен для реагирования на мобильные устройства. Стили мобильных устройств являются частью базовой платформы.
Чтобы обеспечить правильную визуализацию и масштабирование касания, добавьте следующий тег внутри элемента:
<meta name=»viewport» content=»width=device-width, initial-scale=1″>
деталь устанавливает ширину страницы для того чтобы последовать за шириной экрана прибора (которая будет меняться в зависимости от прибора).
деталь задает начальный уровень масштабирования при первой загрузке страницы обозревателем.
3. контейнеры
Bootstrap также требуется содержащий элемент для переноса содержимого сайта.
Есть два контейнера классов на выбор:
- класс обеспечивает адаптивный контейнер с фиксированной шириной
- класс предоставляет контейнер с полной шириной, охватывающий всю ширину видового экрана
.container
.container-fluid
Sass
При использовании исходных файлов Sass в Bootstrap у Вас есть возможность использовать переменные и миксины Sass для создания настраиваемых, семантических и адаптивных макетов страниц. Наши предопределенные классы сетки используют те же самые переменные и миксины, чтобы предоставить целый набор готовых к использованию классов для быстрых адаптивных макетов.
Переменные
Переменные и карты определяют количество колонок, ширину промежутка и точку медиа-запроса, с которой следует начинать колонки с плавающей запятой. Мы используем их для создания предопределенных классов сетки, описанных выше, а также для пользовательских миксинов, перечисленных ниже.
Пример использования
Вы можете изменить переменные на свои собственные значения или просто использовать миксины со значениями по умолчанию. Вот пример использования настроек по умолчанию для создания макета из двух колонок с промежутком между ними.
Главное содержимое
Вторичное содержимое
Create First Web Page With Bootstrap
1. Add the HTML5 doctype
Bootstrap uses HTML elements and CSS properties that require
the HTML5 doctype.
Always include the HTML5 doctype at the beginning of
the page, along with the lang attribute and the correct character set:
<!DOCTYPE html><html lang=»en»> <head> <meta charset=»utf-8″> </head></html>
2. Bootstrap 3 is mobile-first
Bootstrap 3 is designed to be responsive to mobile devices. Mobile-first styles are
part of the core framework.
To ensure proper rendering and touch zooming, add the following tag inside the
element:
<meta name=»viewport» content=»width=device-width, initial-scale=1″>
The part sets the width of the page to follow the screen-width
of the device (which will vary depending on the device).
The part sets the initial zoom level when the page is first loaded
by the browser.
3. Containers
Bootstrap also requires a containing element to wrap site contents.
There are two container classes to choose from:
- The class provides a responsive fixed width container
- The class provides a full width container, spanning the entire width of the viewport
.container
.container-fluid
Quick start
Looking to quickly add Bootstrap to your project? Use BootstrapCDN, provided for free by the folks at StackPath. Using a package manager or need to download the source files? Head to the downloads page.
JS
Many of our components require the use of JavaScript to function. Specifically, they require jQuery, Popper.js, and our own JavaScript plugins. Place the following s near the end of your pages, right before the closing tag, to enable them. jQuery must come first, then Popper.js, and then our JavaScript plugins.
We use jQuery’s slim build, but the full version is also supported.
Curious which components explicitly require jQuery, our JS, and Popper.js? Click the show components link below. If you’re at all unsure about the general page structure, keep reading for an example page template.
Our and include Popper, but not jQuery. For more information about what’s included in Bootstrap, please see our section.
Show components requiring JavaScript
- Alerts for dismissing
- Buttons for toggling states and checkbox/radio functionality
- Carousel for all slide behaviors, controls, and indicators
- Collapse for toggling visibility of content
- Dropdowns for displaying and positioning (also requires Popper.js)
- Modals for displaying, positioning, and scroll behavior
- Navbar for extending our Collapse plugin to implement responsive behavior
- Tooltips and popovers for displaying and positioning (also requires Popper.js)
- Scrollspy for scroll behavior and navigation updates
Community
Stay up to date on the development of Bootstrap and reach out to the community with these helpful resources.
- Follow @getbootstrap on Twitter.
- Read and subscribe to The Official Bootstrap Blog.
- Join the official Slack room.
- Chat with fellow Bootstrappers in IRC. On the server, in the channel.
- Implementation help may be found at Stack Overflow (tagged ).
- Developers should use the keyword on packages which modify or add to the functionality of Bootstrap when distributing through npm or similar delivery mechanisms for maximum discoverability.
You can also follow @getbootstrap on Twitter for the latest gossip and awesome music videos.
Quick start
Looking to quickly add Bootstrap to your project? Use BootstrapCDN, provided for free by the folks at StackPath. Using a package manager or need to download the source files? Head to the downloads page.
JS
Many of our components require the use of JavaScript to function. Specifically, they require jQuery, Popper.js, and our own JavaScript plugins. Place the following s near the end of your pages, right before the closing tag, to enable them. jQuery must come first, then Popper.js, and then our JavaScript plugins.
We use jQuery’s slim build, but the full version is also supported.
Curious which components explicitly require jQuery, our JS, and Popper.js? Click the show components link below. If you’re at all unsure about the general page structure, keep reading for an example page template.
Our and include Popper, but not jQuery. For more information about what’s included in Bootstrap, please see our section.
Show components requiring JavaScript
- Alerts for dismissing
- Buttons for toggling states and checkbox/radio functionality
- Carousel for all slide behaviors, controls, and indicators
- Collapse for toggling visibility of content
- Dropdowns for displaying and positioning (also requires Popper.js)
- Modals for displaying, positioning, and scroll behavior
- Navbar for extending our Collapse plugin to implement responsive behavior
- Tooltips and popovers for displaying and positioning (also requires Popper.js)
- Scrollspy for scroll behavior and navigation updates
Community
Stay up to date on the development of Bootstrap and reach out to the community with these helpful resources.
- Read and subscribe to The Official Bootstrap Blog.
- Join the official Slack room.
- Chat with fellow Bootstrappers in IRC. On the server, in the channel.
- Implementation help may be found at Stack Overflow (tagged ).
- Developers should use the keyword on packages that modify or add to the functionality of Bootstrap when distributing through npm or similar delivery mechanisms for maximum discoverability.
You can also follow @getbootstrap on Twitter for the latest gossip and awesome music videos.
What is Bootstrap?
- Bootstrap is a free front-end framework for faster and easier web development
- Bootstrap includes HTML and CSS based design templates for typography, forms, buttons, tables, navigation, modals, image carousels and many other, as well as optional JavaScript plugins
- Bootstrap also gives you the ability to easily create responsive designs
What is Responsive Web Design?
Responsive web design is about creating web sites which automatically adjust
themselves to look good on all devices, from small phones to large desktops.
Bootstrap Example
<div class=»jumbotron text-center»> <h1>My First Bootstrap Page</h1> <p>Resize this responsive page to see the effect!</p> </div><div class=»container»> <div class=»row»>
<div class=»col-sm-4″> <h3>Column 1</h3> <p>Lorem ipsum
dolor..</p> </div> <div class=»col-sm-4″> <h3>Column 2</h3> <p>Lorem ipsum
dolor..</p> </div> <div class=»col-sm-4″> <h3>Column 3</h3> <p>Lorem ipsum
dolor..</p> </div> </div></div>
Адаптивные классы
Сетка Bootstrap включает шесть уровней предопределенных классов для создания сложных адаптивных макетов. Настройте размер колонок на очень маленьких, маленьких, средних, больших или очень больших устройствах по своему усмотрению.
Все контрольные точки
Для сеток, одинаковых от самых маленьких до самых крупных, используйте классы и . Укажите нумерованный класс, если Вам нужна колонка определенного размера; в противном случае не стесняйтесь использовать .
col
col
col
col
col-8
col-4
Сложение по горизонтали
Используя один набор классов , Вы можете создать базовую систему сеток, которая начинается с накопления и становится горизонтальной в малой контрольной точке ().
col-sm-8
col-sm-4
col-sm
col-sm
col-sm
Смешение и сочетание
Не хотите, чтобы Ваши колонки просто складывались в несколько ярусов сетки? При необходимости используйте комбинацию разных классов для каждого уровня. См. пример ниже, чтобы лучше понять, как все это работает.
.col-md-8
.col-6 .col-md-4
.col-6 .col-md-4
.col-6 .col-md-4
.col-6 .col-md-4
.col-6
.col-6
Ряд колонок
Используйте адаптивные классы , чтобы быстро установить количество столбцов, которые лучше всего отображают ваш контент и макет. В то время как обычные классы применяются к отдельным столбцам (например, ), классы столбцов строк устанавливаются в родительском по умолчанию для содержащихся столбцов. С помощью вы можете придать столбцам их естественную ширину.
Используйте эти классы столбцов строк для быстрого создания базовых макетов сетки или для управления макетами карточек и переопределения при необходимости на уровне столбцов.
Колонка
Колонка
Колонка
Колонка
Колонка
Колонка
Колонка
Колонка
Колонка
Колонка
Колонка
Колонка
Колонка
Колонка
Колонка
Колонка
Колонка
Колонка
Колонка
Колонка
Колонка
Колонка
Колонка
Колонка
Колонка
Колонка
Колонка
Колонка
Колонка
Колонка
Колонка
Колонка
Колонка
Колонка
Колонка
Колонка
Вы также можете использовать сопутствующий миксин Sass, :
Community
Stay up to date on the development of Bootstrap and reach out to the community with these helpful resources.
- Follow @getbootstrap on Twitter.
- Read and subscribe to The Official Bootstrap Blog.
- Join the official Slack room.
- Chat with fellow Bootstrappers in IRC. On the server, in the channel.
- Implementation help may be found at Stack Overflow (tagged ).
- Developers should use the keyword on packages which modify or add to the functionality of Bootstrap when distributing through npm or similar delivery mechanisms for maximum discoverability.
You can also follow @getbootstrap on Twitter for the latest gossip and awesome music videos.
Что такое Bootstrap?
Bootstrap — это открытый и бесплатный HTML, CSS и JS фреймворк, который используется веб-разработчиками для быстрой вёрстки адаптивных дизайнов сайтов и веб-приложений.
Фреймворк Bootstrap используется по всему миру не только независимыми разработчиками, но иногда и целыми компаниями. На Bootstrap создано очень много различных сайтов, посмотреть их можно на странице Bootstrap Expo.
Основная область его применения – это фронтенд разработка сайтов и интерфейсов админок. Среди аналогичных систем (Foundation, UIkit, Semantic UI, InK и др.) фреймворк Bootstrap является самым популярным.
Почему Bootstrap так популярен? Это связано с тем, что он позволяет верстать сайты в несколько раз быстрее, чем на «чистом» CSS и JavaScript. А в нашем мире, время – это очень ценный ресурс. Ещё один его аспект – доступность. Она сводится к тому, что предоставляет возможность даже начинающему веб-разработчику (без глубоких знаний и достаточной практики) создавать достаточно качественные макеты.
Фреймворк Bootstrap – это набор набор CSS и JavaScript файлов. Чтобы его использовать эти файлы необходимо просто подключить к странице. После этого вам станут доступны инструменты данного фреймворка: колоночная система (сетка Bootstrap), классы и компоненты.
Как он работает? Например, чтобы создать кнопку на странице с помощью Bootstrap, достаточно к ссылке или элементу добавить всего несколько классов.
Создание кнопки в Bootstrap 5:
<!-- Чтобы сделать ссылку в виде кнопки добавим к ней 2 класса: btn и btn-success -->
<a href="#" class="btn btn-success">Ссылка, оформленная в виде кнопки</a>
Ну как? Сколько на это потребовалось времени? Да, всего несколько секунд.
А если, например, нужно создать вкладки. Для этого необходимо всего лишь скопировать готовый HTML фрагмент, и отредактировать его так, чтобы в нём остался код для определённого количества вкладок:
<!-- Bootstrap 5 -->
<nav>
  <div class="nav nav-tabs" id="tab" role="tablist">
    <!-- атрибут data-bs-target должен указывать на элемент, который необходимо показать -->
    <button class="nav-link active" id="tab-section-1" data-bs-toggle="tab" data-bs-target="#section-1" type="button" role="tab" aria-controls="nav-section-1" aria-selected="true">Секция 1</button>
    <button class="nav-link" id="tab-section-2" data-bs-toggle="tab" data-bs-target="#section-2" type="button" role="tab" aria-controls="nav-section-2" aria-selected="false">Секция 2</button>
    <button class="nav-link" id="tab-section-3" data-bs-toggle="tab" data-bs-target="#section-3" type="button" role="tab" aria-controls="nav-section-3" aria-selected="false">Секция 3</button>
  </div>
</nav>
<div class="tab-content p-3" id="nav-tabContent">
  <!-- атрибут id определяет вкладку -->
  <div class="tab-pane fade show active" id="section-1" role="tabpanel" aria-labelledby="nav-section-1-tab">
    ...
  </div>
  <div class="tab-pane" id="section-2" role="tabpanel" aria-labelledby="nav-section-2-tab">
    ...
  </div>
  <div class="tab-pane fade" id="section-3" role="tabpanel" aria-labelledby="nav-section-3-tab">
    ...
  </div>
</div>
Всё, вкладки готовы. На это тоже ушли считанные секунды. Правда, потрясающая скорость. В этом сила Bootstrap.
Но, Bootstrap – это не просто набор готовых инструментов (HTML фрагментов, классов, компонентов и плагинов), а хорошо спроектированный фронтенд фреймворк, который довольно просто можно настроить под себя посредством редактирования Sass переменных и использования миксинов.
Quick start
Looking to quickly add Bootstrap to your project? Use jsDelivr, a free open source CDN. Using a package manager or need to download the source files? Head to the downloads page.
JS
Many of our components require the use of JavaScript to function. Specifically, they require our own JavaScript plugins and Popper. Place one of the following s near the end of your pages, right before the closing tag, to enable them.
Bundle
Include every Bootstrap JavaScript plugin and dependency with one of our two bundles. Both and include Popper for our tooltips and popovers. For more information about what’s included in Bootstrap, please see our section.
Separate
If you decide to go with the separate scripts solution, Popper must come first (if you’re using tooltips or popovers), and then our JavaScript plugins.
Components
Curious which components explicitly require our JavaScript and Popper? Click the show components link below. If you’re at all unsure about the general page structure, keep reading for an example page template.
Show components requiring JavaScript
- Alerts for dismissing
- Buttons for toggling states and checkbox/radio functionality
- Carousel for all slide behaviors, controls, and indicators
- Collapse for toggling visibility of content
- Dropdowns for displaying and positioning (also requires Popper)
- Modals for displaying, positioning, and scroll behavior
- Navbar for extending our Collapse plugin to implement responsive behavior
- Toasts for displaying and dismissing
- Tooltips and popovers for displaying and positioning (also requires Popper)
- Scrollspy for scroll behavior and navigation updates
Important globals
Bootstrap employs a handful of important global styles and settings that you’ll need to be aware of when using it, all of which are almost exclusively geared towards the normalization of cross browser styles. Let’s dive in.
HTML5 doctype
Bootstrap requires the use of the HTML5 doctype. Without it, you’ll see some funky incomplete styling, but including it shouldn’t cause any considerable hiccups.
Responsive meta tag
Bootstrap is developed mobile first, a strategy in which we optimize code for mobile devices first and then scale up components as necessary using CSS media queries. To ensure proper rendering and touch zooming for all devices, add the responsive viewport meta tag to your .
You can see an example of this in action in the .
Box-sizing
For more straightforward sizing in CSS, we switch the global value from to . This ensures does not affect the final computed width of an element, but it can cause problems with some third-party software like Google Maps and Google Custom Search Engine.
On the rare occasion you need to override it, use something like the following:
With the above snippet, nested elements—including generated content via and —will all inherit the specified for that .
Learn more about box model and sizing at CSS Tricks.
Reboot
For improved cross-browser rendering, we use Reboot to correct inconsistencies across browsers and devices while providing slightly more opinionated resets to common HTML elements.
Alignment
Use flexbox alignment utilities to vertically and horizontally align columns.
Vertical alignment
One of three columns
One of three columns
One of three columns
One of three columns
One of three columns
One of three columns
One of three columns
One of three columns
One of three columns
One of three columns
One of three columns
One of three columns
Horizontal alignment
One of two columns
One of two columns
One of two columns
One of two columns
One of two columns
One of two columns
One of two columns
One of two columns
One of two columns
One of two columns
No gutters
The gutters between columns in our predefined grid classes can be removed with . This removes the negative s from and the horizontal from all immediate children columns.
Here’s the source code for creating these styles. Note that column overrides are scoped to only the first children columns and are targeted via attribute selector. While this generates a more specific selector, column padding can still be further customized with spacing utilities.
Need an edge-to-edge design? Drop the parent or .
In practice, here’s how it looks. Note you can continue to use this with all other predefined grid classes (including column widths, responsive tiers, reorders, and more).
.col-12 .col-sm-6 .col-md-8
.col-6 .col-md-4
Column wrapping
If more than 12 columns are placed within a single row, each group of extra columns will, as one unit, wrap onto a new line.
.col-9
.col-4Since 9 + 4 = 13 > 12, this 4-column-wide div gets wrapped onto a new line as one contiguous unit.
.col-6Subsequent columns continue along the new line.
Column breaks
Breaking columns to a new line in flexbox requires a small hack: add an element with wherever you want to wrap your columns to a new line. Normally this is accomplished with multiple s, but not every implementation method can account for this.
.col-6 .col-sm-3
.col-6 .col-sm-3
.col-6 .col-sm-3
.col-6 .col-sm-3
You may also apply this break at specific breakpoints with our responsive display utilities.
.col-6 .col-sm-4
.col-6 .col-sm-4
.col-6 .col-sm-4
.col-6 .col-sm-4
Internet Explorer 8 и Respond.js
Примите во внимание следующие оговорки, при использовании Respond.js в вашей среде разработки, в рабочей среде Internet Explorer 8
Respond.js и кросс-доменный CSS
Если вы храните Respond.js и CSS на разных (суб)доменах (например, на CDN) — это требует некоторых дополнительных установок. для уточнений.
Respond.js и
Через правила безопасности браузера, Respond.js не работает при просмотре через протокол (например, когда вы открываете HTML файл локально). Чтобы протестировать настройки чувствительности в IE8, просматривайте ваши страницы через HTTP(S). для уточнений.
Respond.js и
Respond.js не работает с CSS, на которые ссылаются как . В частности, некоторые конфигурации Drupal, как известно, используют . для уточнений.
Reordering
Order classes
Use classes for controlling the visual order of your content. These classes are responsive, so you can set the by breakpoint (e.g., ). Includes support for through across all five grid tiers.
First, but unordered
Second, but last
Third, but first
There are also responsive and classes that change the of an element by applying and (), respectively. These classes can also be intermixed with the numbered classes as needed.
First, but last
Second, but unordered
Third, but first
Offsetting columns
You can offset grid columns in two ways: our responsive grid classes and our margin utilities. Grid classes are sized to match columns while margins are more useful for quick layouts where the width of the offset is variable.
Offset classes
Move columns to the right using classes. These classes increase the left margin of a column by columns. For example, moves over four columns.
.col-md-4
.col-md-4 .offset-md-4
.col-md-3 .offset-md-3
.col-md-3 .offset-md-3
.col-md-6 .offset-md-3
In addition to column clearing at responsive breakpoints, you may need to reset offsets. See this in action in the grid example.
.col-sm-5 .col-md-6
.col-sm-5 .offset-sm-2 .col-md-6 .offset-md-0
.col-sm-6 .col-md-5 .col-lg-6
.col-sm-6 .col-md-5 .offset-md-2 .col-lg-6 .offset-lg-0
Margin utilities
With the move to flexbox in v4, you can use margin utilities like to force sibling columns away from one another.
.col-md-4
.col-md-4 .ml-auto
.col-md-3 .ml-md-auto
.col-md-3 .ml-md-auto
.col-auto .mr-auto
.col-auto
Responsive classes
Bootstrap’s grid includes six tiers of predefined classes for building complex responsive layouts. Customize the size of your columns on extra small, small, medium, large, or extra large devices however you see fit.
All breakpoints
For grids that are the same from the smallest of devices to the largest, use the and classes. Specify a numbered class when you need a particularly sized column; otherwise, feel free to stick to .
col
col
col
col
col-8
col-4
Stacked to horizontal
Using a single set of classes, you can create a basic grid system that starts out stacked and becomes horizontal at the small breakpoint ().
col-sm-8
col-sm-4
col-sm
col-sm
col-sm
Mix and match
Don’t want your columns to simply stack in some grid tiers? Use a combination of different classes for each tier as needed. See the example below for a better idea of how it all works.
.col-md-8
.col-6 .col-md-4
.col-6 .col-md-4
.col-6 .col-md-4
.col-6 .col-md-4
.col-6
.col-6
Row columns
Use the responsive classes to quickly set the number of columns that best render your content and layout. Whereas normal classes apply to the individual columns (e.g., ), the row columns classes are set on the parent as a default for contained columns. With you can give the columns their natural width.
Use these row columns classes to quickly create basic grid layouts or to control your card layouts and override when needed at the column level.
Column
Column
Column
Column
Column
Column
Column
Column
Column
Column
Column
Column
Column
Column
Column
Column
Column
Column
Column
Column
Column
Column
Column
Column
Column
Column
Column
Column
Column
Column
Column
Column
Column
Column
Column
Column
You can also use the accompanying Sass mixin, :